Seafood Sauté

I really like seafood and I've found a simple, easy way to eat it when time is at a minimum. I just use one lb. of raw, shelled, tail off small shrimp and one lb. of raw, small scallops **Living in Idaho, I just buy the one pound frozen bags from the freezer section at the grocery store. The smaller size also seems to make quality less of an issue.**
I just use whatever pasta I have on hand and boil it as directed. While that's boiling, I sauté the shrimp and scallops in butter with some garlic. Once they're done, I add a little white wine, some cream, fresh lemon zest and juice, and then whatever I have on hand. Some things I've found that go good in this dish - green onions, fresh cherry tomatoes cut in half, left over bacon pieces, fresh baby spinach or pictured below, sundried tomatoes and fresh basil. Finally, I drain the pasta, reserving a little of the pasta water, and then add both to the pan of shrimp and scallops. Salt and pepper to taste. We like it topped with a little parmesan. Everything is better topped with cheese....for sure.
I just use whatever pasta I have on hand and boil it as directed. While that's boiling, I sauté the shrimp and scallops in butter with some garlic. Once they're done, I add a little white wine, some cream, fresh lemon zest and juice, and then whatever I have on hand. Some things I've found that go good in this dish - green onions, fresh cherry tomatoes cut in half, left over bacon pieces, fresh baby spinach or pictured below, sundried tomatoes and fresh basil. Finally, I drain the pasta, reserving a little of the pasta water, and then add both to the pan of shrimp and scallops. Salt and pepper to taste. We like it topped with a little parmesan. Everything is better topped with cheese....for sure.

All the kids love this dish and I love anything that doesn't warrant complaints. It's a win - win!
Toasted Roast Beef Sandwiches w/ Jalapeno Jelly

I like making sandwiches on french bread. I only have to compile one sandwich, maybe two, and just slice them according to how much someone would like. It saves time and gives me flexibility on serving portions.
I sliced my bread, brushed it with olive oil and toasted it until golden brown.

Then I placed my sliced roast beef in a pot with a little water and let it simmer, just to warm through. While that happened, I sauteed some yellow onion and finished by deglazing the pan with a little cooking sherry.

I topped my toasted bread with some cream cheese and jalapeno jelly on one side and some sliced swiss on the other.

I popped them back under the broiler, just enough to melt the cheese, pulled them out, topped them with the onions and warm roast beef....delish.
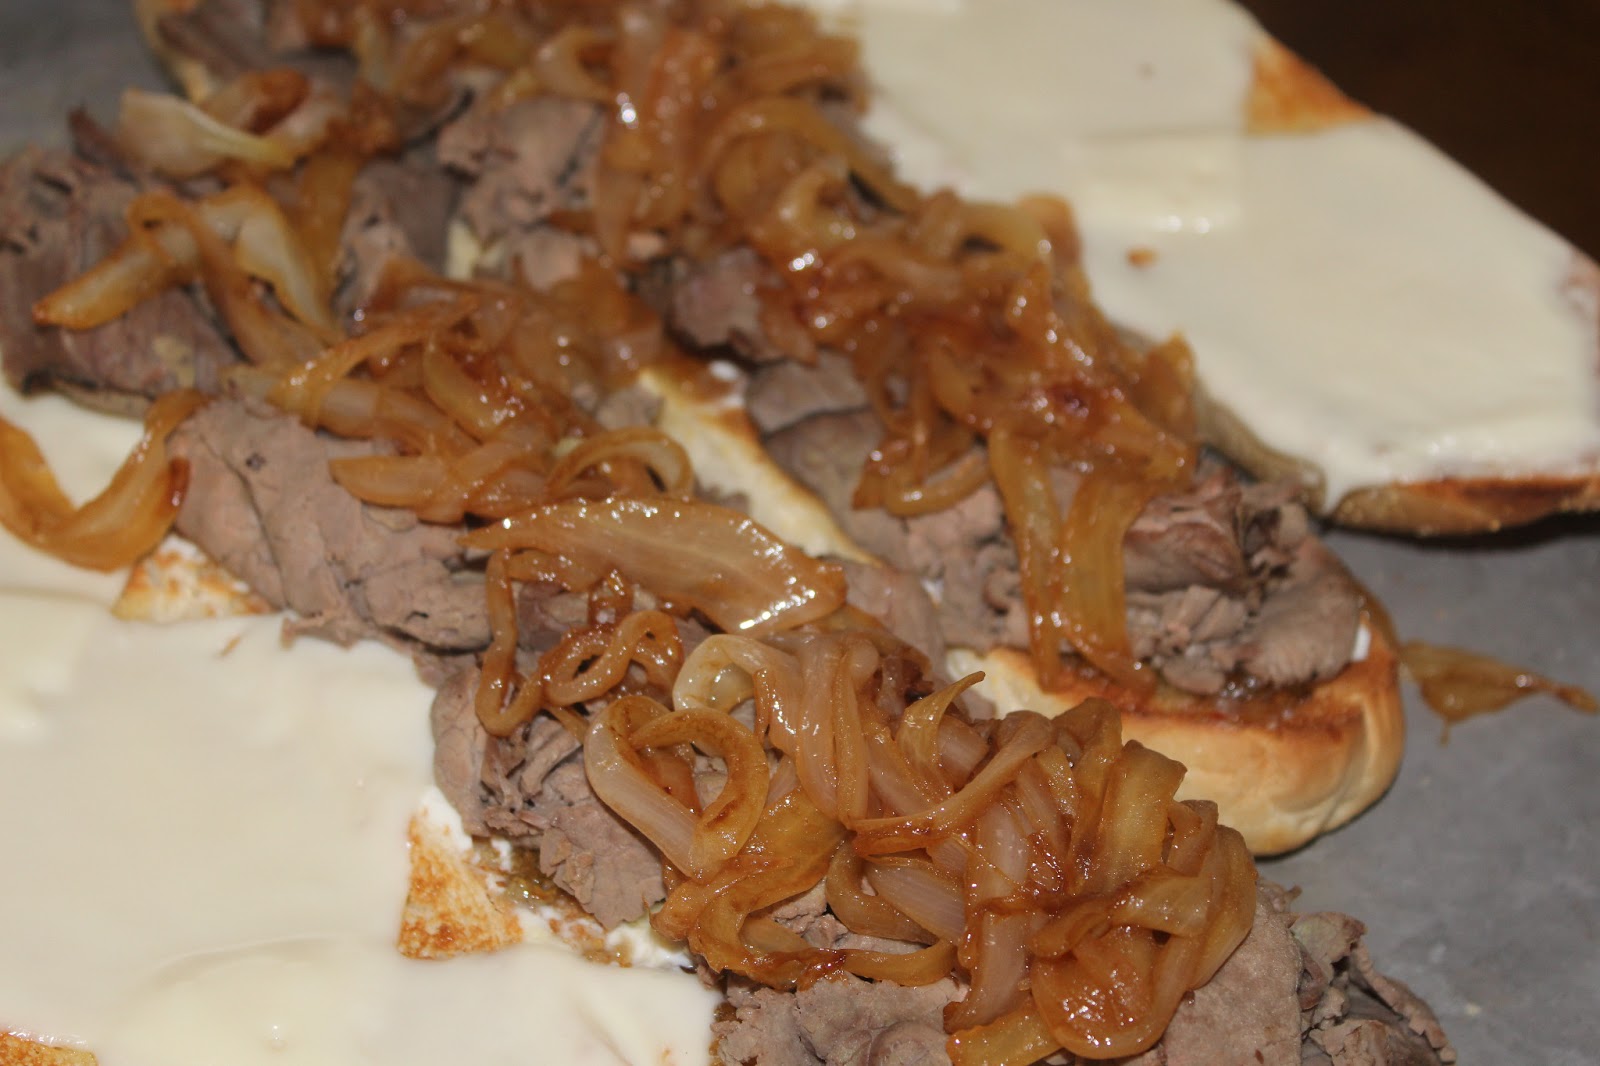
The combination of spicy and sweet was just right.
Pear Apple Crisp
While visiting my friend, Paulette, in Portland last fall, she had us throw together a crisp. I was kind of shocked that even though we didn't really follow a recipe, it turned out delicious. I attempted to repeat this yesterday.
I basically sliced three large apples into thin slices and cubed three pears. I left the peel on because I think it adds fiber and nutrients that would be missing if I'd peeled them. I could be wrong and I could just be lazy.
I tossed them with a little lemon juice and threw in a handful of dried cherries.

I placed it all in a 9 x13 pan, sprinkled it with some brown sugar, and dollops of butter. In a separate bowl, I combined some oats, cinnamon, sugar, flour, and chopped nuts. I solely went off of the proportions that I wanted. Then I melted another stick of butter and combined it with the dry mixture. I had to melt a little more and add, so that it was moist and somewhat lumpy.

I dumped my oat mixture on top of my apples and pears, popped it into a 375 oven for about 45 minutes. I just checked the done-ness of the apples with a fork and took it out when they were soft but not mushy.
I could have topped it with whipped cream, but I was lazy so we just added some cold half and half to the warm crisp. It was just as good. I wish I had an after photo, but I forgot to snap one. I was too busy eating.
One of My Favs

While I was at culinary arts school at Bridgerland, one of the websites that we were encouraged to look at for recipes was cooksillustrated.com. It is super detailed in it's directions and gives insight into what makes a recipe work and troubles that could arise. Since leaving school, I have subscribed to the website and referred to it often.
Not only do they have a website, they also put out various periodicals under the titles America's Test Kitchen and Cooks Illustrated. I was super excited and happy when I found this magazine yesterday. It has a wide variety of recipes - soups, main courses, desserts, salads, etc. Maybe now that basketball is winding down, I will have some time to get creative and try out a few.
Karen's Clam Chowder
I have always loved my mom's clam chowder. It's warm creaminess was a must on this dreary day.

This will be kind of a loose recipe because I don't actually use measured amounts. I'll try my best to be specific.
I took five medium potatoes and cubed them. I put them in a pot of salted boiling water and cooked them until just tender. I didn't want to boil them too much or else they would be mush by the time they simmer with the other ingredients.
While they boiled, I cut up approximately one pound of bacon in bite size pieces. I sauteed the bacon until about half way to perfection and added one medium yellow onion, chopped.

Once the onion turned soft and translucent, I turned the heat off and stirred in a heaping 1/4 cup of flour to the skillet. The flour, mixed with the bacon grease forms a roux that will thicken the chowder.
Once the potatoes were cooked to perfection - soft, but not mushy - I drained enough water off that the potatoes were barely submerged. I then added a couple cups of cream, the bacon/onion/flour mixture, and two cans of minced clams (drained). I also added salt and pepper to taste and some parsley flakes for color. Then, just let it simmer to blend the flavors.

*I think this recipe of clam chowder can appeal to a larger crowd because of the bacon factor. Who doesn't love bacon? Plus, the bacon adds a heartiness that seems to make it feel more like a meal instead of an appetizer - that can be an issue around here when soup is for dinner.
Enjoy!!
Garlic Mushroom Chicken

This is going to be a pretty loose recipe, seeing that I just kind of made it up as I went along using what I had on hand.
I had five chicken breasts, a box of sliced mushrooms (the ones you buy pre-sliced at the store), and some cream I needed to use, so this is how it went down.
I heated my skillet to med-high or even a little hotter. I melted a half stick of butter in the pan and just before it started to turn brown, I added my chicken breasts. These had been frozen in a ziplock bag with some lemon juice, garlic, and herbs previously because I bought a bunch while they were on sale, so all that goodness was already there when I went to brown them. They had thawed, of course, before I put them in.
I cooked each side until it got a nice golden brown crust. I then removed the chicken breasts, placed them on a cookie sheet, and transferred them to a warm oven. To my skillet, I added the rest of the stick of butter, let it melt, and threw in my mushrooms. I sauteed those to my liking and just before they were perfect, I added some minced garlic and finished sauteing for another couple of minutes. I then removed the mushrooms and garlic.
I didn't have any white wine on hand, so I just used some cooking sherry to deglaze the bottom of the pan. I let that simmer for a few minutes, added my cream, some salt and pepper, and threw back in the mushrooms and chicken.

I just let it all simmer together until I was sure the chicken had cooked through. It turned out really good. The kids gobbled it up and the chicken was super moist.
Pear

Sometimes there is nothing better than what nature intended - no recipe or fussing can top the simplistic deliciousness of food at it's peak of perfection. It's PEARfection!!
Eggnog Panna Cotta

I am slightly obsessed with Organic Valley's eggnog. I have already consumed, solely, four quarts of this creamy goodness. It will explain the 20 lbs. I will probably gain over the next couple of weeks while this delightful product is available.
I realized that I needed to find a way to share the love, so I decided to try making eggnog panna cotta. Panna cotta is an Italian dessert made out of a mixture of milk, cream, and sugar simmered together and then mixed with gelatin. I first tried this delight while at school. My teacher, Rex, introduced me to it. It is kind of like a luscious pudding, but better. Anyway, I just simmered my eggnog, added the gelatin, poured it into molds, and chilled.

A made some buttery snickerdoodle cookies, topped them with the panna cotta and drizzled some carmel sauce over the top. The flavor was great. The panna cotta was a little less firm than I would like, so I'll work on perfecting that. All in all, it turned out really well. Happy holidays....now let's drink to that! Pass the eggnog!!
White Bean Chicken Chilli
A few months back, I had a friend show me how to pressure bottle my own beans. It was super simple and I like knowing how old my canned/bottled food is. For the amount of time invested, I've been more than happy with the results and the convenience.

I bottled white, red kidney, and black beans. I've used them more than I actually thought I would - using the black beans in salsa and the red ones in chilli. I wanted to use some of the white ones and decided to throw together a white bean chicken chilli.
Ingredients:
1 lrg onion, diced
1/2 c. (1 stick) of butter
1 T. minced garlic
1/2 c. flour
pint Organic Valley half and half
1 quart chicken stock
2 - 3 c. cooked, shredded chicken
2 pints white beans
1 can green chillies
salt, pepper, & red pepper flakes - to taste
grated cheese, cilantro, & sour cream for garnish
Saute onion in butter until soft and translucent. Add minced garlic and continue to cook for 2 more minutes. Add flour to form a roux. Cook for just a minute then added the half and half. Slowly add chicken stock until desired consistency. Throw in beans, cooked chicken, and green chillies. Add salt, pepper, and some red pepper flakes to taste. Finally, dish up and garnish with grated cheese (choose your favorite), sour cream, and cilantro. My kids gobbled it up!
*FYI - this makes a huge pot full - plenty of left overs!

*sad that I didn't have any cilantro on hand for the pic.
Pie Crust - just in time!!
I have finally found a pie crust recipe that doesn't intimidate me and is filled with my true love, butter! Since Thanksgiving is just around the corner, I thought I would share. The only downfall seems to be that this recipe has a little harder time holding it's pretty scalloped edge - maybe because of the amount of butter. Who cares, it tastes amazing!

A few tips - make sure that you use butter straight from the fridge, ice water, and this nifty butter cutter that I found at a thrift store does half of the work.
Pie Crust
2 1/2 c. unbleached all purpose flour
1/2 t. salt
1/4 t. baking powder
1 T. sugar
1 c. (2 sticks) chilled Organic Valley butter
3-6 T. ice water
Combine first four ingredients in a bowl with fork. Cut or break butter into small pieces (this is where I used the butter cutter) and toss to coat. Using fingertips, slide butter pieces between thumb fingers, pressing them to make small flat sheets of butter and dropping them back into flour. Work quickly so butter doesn't warm. Repeat until mixture resembles coarse meal. Add 3 tablespoons of cold water and toss with fork. Pinch to see if dough holds together. Gradually add water until desired consistency. Divide in two, cover with plastic wrap, and place in the fridge for at least one hour. Makes two 9 inch pie crusts. Use in your favorite pie recipe!
*sorry no pie pics - the family devoured it before I could take any.
Homemade Granola Bars

If you are at all like our family, you consume a lot of granola bars. I am not sure how much better they are for you than candy bars (some with tons of sugar and chocolate dipped), but I feel better when I can at least see whole grains. The only problem at our house is that everyone prefers a different kind and brand. The littler kids prefer the more sugary ones, the older girls like the healthier ones, and I like to buy the organic ones so I know what's in them. The organic ones cost more, are harder to find, and are usually less palatable than the others. So we tried making some of our own at home.

The best thing about making them ourselves, is we get to choose exactly what goes in them and we can also make a variety to satisfy all for a fraction of the cost. We made three different kinds: plain w/ the bottoms dipped in chocolate, dried cherry dark chocolate chip, and finally, mocha chocolate chip. All of them had almonds, pecans, and oats as their base. We drizzled the cherry ones with chocolate and the mocha ones with some white chocolate.

I was a little worried that some would like them and some would whine for their usual kind, but surprisingly, they all found a kind they enjoyed. I only spent the morning making them and the recipe turned out a lot......bonus!! Now, I just wonder how long they will last.....

Kale Anyone?

I had never heard of kale until last summer when I read a recipe for kale chips. They are similar to a potato chip, but much more healthy. You simply cut the middle stem out and cut the leaves into large pieces, toss with olive oil, salt and pepper them, and bake @ 300 for 20 minutes or until crisp.
My family loves them so I decided to grow some kale in our garden this year. It took off like gang busters. Just the other day I picked four grocery sacks full. It looks like I'll have plenty of kale to share. Try them. They are tasty, healthy, and easy to make.

Runaway Radishes
I got my garden in a little late this year, so my radishes are barely coming on.......well, you know how it goes - they are ready and then you have oodles of them and not enough time to eat them all before they get a little big, bitter, and woody.
Since they are so easily grown, I've often wondered why there aren't more recipes out there for radishes. I did some "googling" and found a few. Hopefully they will aid me in my radish consumption.

The recipe that I thought would work well was Roasted Radishes. It was very simple and I knew the roasting part would take a little bit of the bitterness and bite from the radishes. Basically, you just quarter them, toss them with some olive oil, fresh oregano (which is doing well in my garden also), salt, and pepper, and bake them until tender in a 425* oven.

They turned out pretty good. I mixed them in with a grilled pesto chicken salad. The kids all seemed to enjoy them and some even wanted to eat the leftovers plain. Ahhh, the feeling of success...
Also, don't throw out those radish tops! I found a recipe for a radish green pesto that sounded delish! I'll keep you posted.....

Family Tradition

It almost seems silly to post about this, but it's something our family, and extended family do on a regular basis. I believe it was passed down from my Grandma Fonnesbeck, Melvina, and it is quite enjoyable......that is if you love butter - which I do, tremendously!!
All it takes is a cake mix, ingredients called for, and a cube of butter! I found this new Betty Crocker cake mix, Butter Recipe Chocolate. Why not add more butter? Silly question. Anyway, prepare cake mix as directed, pull the cake from the oven and top with as much butter as desired.
Warm cake and butter is delicious! And, if you think about it, the best frostings always contain butter. So on the bright side, you've at least eliminated the extra sugar of the frosting. It's a super easy treat and is gone in minutes.....at least at our house!
*Don't judge me for my huge amounts of butter..........it's my duty, being married to a dairy farmer!!

Red, White, Blue and Easy to do!

It almost seems silly to post this, but it was good and so super easy! With the morning of the 4th being crazy busy trying to get everyone to our local parade, I usually don't fix breakfast. I just let the kids fend for themselves. I've always been jealous of all the red, white, and blue treats people make on the 4th. I wanted to do something, but it had to be easy. Here it is......
2 pkgs. cresent rolls
1 pkg cream cheese
1/2 c. sour cream
1/2 - 1 c. powdered sugar-depending on level of sweetness desired
1 t. vanila
Spray a cookie sheet with some baking spray. Lay out the two sheets of cresent rolls and seal the seams. Bake @ 375 for approximately 12 minutes - remove and cool. While cooling, place the rest of the ingredients in the mixer. Mix on medium until smooth. Spread over cooled crust and sprinkle with berries of choice. I know some people would take the time to arrange them all cute-like, but I was in a hurry and hungry.
Raspberry Lemonade Scones

I will admit that I am a sucker for cute packaging. I couldn't resist buying this scone mix with it's retro colors and vintage flair. It's name is even reminiscent of a simpler time. I knew I was taking a chance on it's quality seeing that I found it at our local Walmart but my love of all things vintage pushed me into giving it a chance!
I've had English scones before and found them a little dry and dense - maybe it was who made them, but they just seemed, well, boring. I had to find a way to jazz this mix up a bit. Here's what I did:
I dumped the mix into a mixing bowl, added the zest of one lemon, took a liquid measuring cup and squeezed into it the juice of the lemon. The recipe on the box called for 3/4 c. water, so I added enough 7up to the lemon juice to come to 3/4 c. as a replacement for the water. I then mixed it as directed, but before kneading it, I added about 1 c. of frozen raspberries. I finished by following the directions for shaping and baking my scones. I was pleasantly surprised by the results.

For the glaze, I just used the juice of 1 lemon, a little milk, some vanilla, and enough powdered sugar to get to the consistency I wanted. It made oodles of glaze - too much. Maybe it would be good on a lemon pound cake.........


Citrus Coconut Butter Cookie
I tweaked a recipe from a book I recently bought. I was happy with the outcome and so were the kids - surprising since there is no chocolate at all in this recipe! The bright flavor of the citrus combined with the sweet of the coconut just seems like summer. Are you feelin' it? You will after eating one of these cookies!
Ingredients:
Cookies:
1 lb. = 4 sticks of butter, softened
1 1/2 c. sugar
2 large eggs separated
3+ T. of citrus zest (lime, lemon, orange is what I used)
4 c. flour
2 T. freshly squeezed orange, lime and/or lemon juice
Icing:
3 c. powdered sugar
2 T. milk
egg whites
2+ T. citrus zest
juice of 1/2 lime
juice of 1/2 lemon
1 - 2 c. finely shredded coconut - as desired
Cream your butter and sugar together. Then add egg yolks and zest. Beat until smooth. Gradually add your flour. Your dough will be a little stiff at this point. Finally add your fresh citrus juice and mix until combined. Take heaping tablespoonfuls and roll into balls and place on a cookie sheet. Bake at 350 for 12 - 13 minutes - just before turning brown. Take out of the oven but leave on the cookie sheet for 3- 4 minutes before moving to a cooling rack.
To make icing - place all ingredients except the coconut in a bowl and whisk together until smooth. Icing should be a little runny - glaze like in consistency. Add enough coconut to thicken and place by spoonfuls on cooled cookies. Icing the cookies this way is super fast. The coconut sits on top while the glaze drizzles down the edges.
* I LOVE this butter based dough. I am going to experiment with it using some jam as a substitute for my sugar then use them, without icing, as cookies in an ice cream sandwich. I'll keep you posted!
Ham & Spinach Stuffed French Bread
 One of the things I love best about Sundays is that I have time to get creative with my cooking. A few weeks back, I glanced over a recipe for a stuffed baguette. Knowing how small baguettes are, I decided that if I were to ever try a recipe like that one, I would most definitely have to use the bigger cousin of the baguette - the french bread.
Over the holidays, I was lucky enough to receive a ham as a gift. We don't eat ham a lot and I knew that I needed to find a recipe to use what I had been given. I remembered two things: a ham and spinach stuffed crepe recipe and the stuffed baguette recipe. Making crepes is a little too labor intensive on my day of rest, so I opted to combine the two and stuff the french bread I had with the ham and spinach filling. It worked like a dream! Everyone enjoyed a nice Sunday lunch and some down time too!
1 loaf of french bread
2 pkgs. of frozen cut spinach - thawed and squeezed dry
1 30 oz. container of ricotta
1-2 cups shredded cheese of your choice - I used an Italian blend
Diced ham - until your "meat quota" is filled
1 yellow onion chopped
4 cloves of garlic minced
sliced mushrooms - if desired and to your liking
olive oil
Cut ends off of loaf and set aside. Hollow out the middle using a knife and hands. Set aside the insides for bread crumbs for a later date. Heat oil in a skillet over med/high heat. Saute onions, garlic, and mushrooms until tender. Cool. Mix onions and mushrooms with other filling ingredients. Add salt, pepper, and a dash of nutmeg to taste. Stuff loaf, replace ends and wrap in tin foil. Place on a cookie sheet in a 400* oven for approximately 30 minutes or until filling is heated through. Slice and serve.

*Filling proportions can be adjusted to your liking
*There is an abundance of filling. I believe using the above recipe, you could fill two loaves if not hollowed out as much.

Plum Tart with Caramel Sauce

I was given a bowl of lovely plums from my neighbor. I've never really cooked/baked much with plums and was excited to use them. I found a simple way to make some small tarts using store bought puff pastry, some cream cheese, and the plums. I unfolded the puff pastry on my floured tabletop, cut them into the size circles that I desired, and placed them on a greased cookie sheet. I baked them @ 400 for about 15 minutes. I took them out as soon as they were golden brown and let them cool. I cut them in half horizontally. Once I did this, I could make a total of 20 tarts. I made a basic cheese cake filling and put a dollop on each tart. I melted 1 stick of butter over medium heat, added 1 c. brown sugar, and 1/2 teaspoon of cinnamon and whisked it together. I sliced my plums and cooked them in the sauce for just a few minutes and then removed them. I added some cream to the brown sugar and butter sauce, maybe 1/4 c. or so, and stirred and cooked for a few more minutes until it was the thickness I desired. I finished off the tarts with a layer of the cooked plums and drizzled with the caramel sauce.
Bean & Bacon meets Corn Chowder
I had a friend post a recipe for corn chowder. It sounded delish, but much to my dismay, I didn't have all the ingredients needed. I did have some other items hiding out in the fridge that needed consuming so - necessity truly is the mother of invention. This is what I came up with. I actually was pleasantly surprised with my creation and the kids seemed to really enjoy it!

1 lb. bacon - cut into bite size pieces
1 medium yellow onion - chopped
1/4 c. flour
2 c. half and half + milk to thin, if needed
3 c. frozen/canned corn - With corn in season right now, fresh could be used. Blanch and cut off the cob.
2 cans White Northern Beans
Salt & Pepper to taste
1 T. Red Pepper Flakes - or more to taste.
1/4 c. fresh chopped parsley
Fry bacon and chopped onion on stove top over med/high heat. Once it's done to your liking, add the flour. This will combine with the bacon grease to form a roux (paste). Continue to cook for just a minute or so. Slowly add your half and half. Sauce will thicken as it cooks. Add milk at this point, if it gets too thick. Transfer to a crock pot on low heat. Add your corn, beans, and parsley. Then carefully add the salt and pepper to taste. Then add the red pepper flakes. The spice seems to balance out the sweet of the corn and adds a little kick. I started with about 1 T. but ended up adding a few more shakes.
As the nights get cooler, this really seems to hit the spot. This soup adds the freshness of what's coming out of the garden and the comfort/warmth of soup for just the right mix of the end of summer and the start of fall!
Pesto Mac n' Cheese
 I know that mac n' cheese seems like a fall/winter comfort food, but with the added pesto, it's fresh and delicious and still comforting. With the summer gardening season upon us and fresh herbs available, this seemed like a good idea to post. It's not hard to do and sooo much better than the boxed kind. If you don't have basil, arugula, or parsley growing in the back forty or for convenience's sake, you can buy ready made pesto. There's one at Sam's Club that I really like and it's not too expensive. I get at least two dinners from one bottle. Here you go -
Preheat oven to 400
1 lb. macaroni noodles - boiled until al dente'.
Cheese Sauce-
3 T. butter
2 T. flour
2 1/2 c. milk
salt, pepper, and a pinch of nutmeg
8 oz. Organic Valley cheddar cheese shreds + extra for top
1 + c. of pesto - to your liking - pesto recipe to follow.
Melt butter in a saucepan over med/high heat. Add the flour while whisking and cook for one minute. Slowly add milk - whisking constantly. Continue to cook until sauce is thick enough to coat the back of a spoon. Add cheese and stir until smooth. Combine with noodles and pesto and place in a 9 x 13 dish. Top with some extra shredded cheese. Pop in the oven for 30 - 40 minutes, until top is golden brown and bubbly. Enjoy!!

Pesto Sauce
1 c. each of loosely packed basil, arugula, and parsley.
1/2 c. toasted walnuts
3 - 4 cloves of garlic
about 1/3 c. olive oil
1/2 c. parmesan cheese
salt and pepper
Pulse in a food processor until smooth
Mother's Day Luncheon Crab Sandwiches
Quite a few years ago, my mother, sisters, and I had a girl's day out in Ogden. We had lunch at Rainbow Gardens. It was delicious. I had an open face crab salad sandwich topped with tomato, avocado, and cheese. I really loved it. I decided to try it at home. I'm sure what I came up with isn't as good, but my family really enjoys it and it's really easy.
When the kids were younger, we used to do a Mother's Day Luncheon the Saturday before Mother's Day for the kid's grandmas and my own grandmother. We'd do lunch for them along with entertainment courtesy of the kids. The crab sandwiches were a favorite with the ladies. More recently, I did it in bite-size form for a Relief Society event. A lot of ladies asked for the recipe - I'm almost embarrassed at how easy it is. Here it goes -
Crab Salad-
1 lb. crab or krab - depending on your budget - cut and shredded into bite-size peices
4 stalks of celery - chopped
 1/2 large red onion - chopped
Approx. 1 c. of mayo - to taste
Salt and Pepper - to taste
Other-
English Muffins or baguette - depending on size of sandwich
tomatoes
avocado
Mild cheese of choice - I've used Organic Valley parmesan and mozerella


Mix first three ingredients of crab salad. Add mayo to desired amount and salt and pepper to taste. Take english muffins and brush with olive oil and toast under broiler to a golden brown -remove. If using baguettes for bite-size version, slice and brush and toast. Top bread with the crab salad, a slice of tomato, avocado, and cheese. Return to broiler to melt cheese. Serve open face along a crisp green salad - makes for a really, fresh, light lunch! Hope you enjoy your Mother's Day!

Monte Cristo meets BLT
I saw a sandwich constructed on a local t.v. news program. It looked very delicious. It was a spicy take off of a Monte Cristo. At least that was my assessment of it. Instead of a raspberry dipping sauce, a raspberry chipotle sauce was used as a spread and pepper jack cheese was paired with turkey. Knowing that the men in my house would yearn for more meat (I'm not sure that they consider turkey a meat, at least not meat suitable for men), I decided that the addition of bacon was a sure-fire way to entice everyone into trying my concoction. I also wanted to make sure that the portion of veggie on this sandwich was in proportion to that of the meat. I simply added the toppings our family likes best - spinach (better than lettuce and more healthy) and tomatoes. Some in the family also had me add avocado, which complimented the spicy aspect of the sandwich. I also like to use a nice, big, crusty loaf of artisan bread. This makes for one assembly and then I simply cut it into the portion sizes needed. So here's what's needed:
one large loaf of crusty artisan bread of your choice
1 pound of thinly sliced turkey - a mesquite flavor works nicely
1/2 - 1 cup mayo - depending on how much spread you want to slather on
roasted raspberry chipotle sauce to taste - roughly 2 T.
6-8 slices of bacon
Organic Valley pepper jack cheese
spinach
tomato
avocado
salt and pepper to taste
On bottom half, layer turkey and cheese. Place this half back under the broiler to melt the cheese and remove. Top with bacon.

 Next, take your mayo and raspberry sauce and mix in a small bowl. Spread this on the top half of loaf. Finish with spinach, tomato, and avocado - or any other toppings you like. Place top on bottom, slice and serve. This has turned out to be one of our family's favorites - plus it's fast and easy and no one complains - oh joy!!
Strawberry Fool
In honor of April Fool's Day, I decided that a good first recipe to post is one for a Strawberry Fool! And, with the strawberries at my local grocery store on sale, it's fresh berry taste, and fun springtime appearance - it's the perfect way to repay the cruel joke mother nature has been playing on us, here in South-eastern Idaho!!
I've altered the traditional recipe for this fool, to use jam instead of a fruit-gelatin mixture. It cuts down on my cost for fresh strawberries and I'm always looking for new ways to use the oodles of jam that I put up each summer. This recipe could be used with any jam and fruit mixture. I'm looking forward to trying this with the other jams and jellies that I have on hand - peach, raspberry, huckleberry, blackberry, etc. I think it would also be fun to mix and match different fresh fruits and jams! Be creative, have fun, and enjoy a taste of spring as the snowflakes are falling!
Strawberry Fool
2 lb. fresh strawberries
4 T. sugar
1 c. strawberry jam
2 c. Organic Valley heavy cream
1/2 c. Organic Valley sour cream
1 t. vanilla extract
1/4 c. whole wheat cracker - crushed
fresh mint sprigs for garnish
Process one pound of strawberries in a food processor until smooth. Strain berry puree through a fine mesh strainer into a liquid measuring cup or bowl. Once all fruit juice has been pushed through the strainer, measure out 1 1/2 c..

Place in a small saucepan over medium heat until it begins to bubble, 4 to 6 minutes. Remove pan from heat and stir in jam until smooth. Transfer to a bowl, cover with plastic wrap, and refrigerate until cold, about 2 hours.
Meanwhile, coarse chop the remaining one pound of strawberries, place in a bowl, toss with 2 T. of sugar, and set aside for 1 hour.

Place cream, sour cream, vanilla extract, and remaining 2 T. of sugar in a chilled mixer bowl. Mix on low speed about 30 seconds, until bubbles form. Increase speed to medium for another 30 seconds, until beaters leave trail. Finally, mix on high until it has doubled in size and stiff peaks form. Transfer 1/3 of whipped cream mixture to a small bowl and set aside.
Remove thickened berry mixture from refrigerator and slowly add to remaining cream mixture while mixing at medium/low speed - just until incorporated.
Transfer uncooked berries to a fine mesh strainer; shake gently to remove any excess juice.
Now, to assemble the Fools. This recipe should be enough for 6 tall parfait glasses or, as I like, 10 -12 smaller servings. I really enjoyed assembling them into vintage jelly jars - so cute and just enough to satisfy any sweet tooth. Start with the a couple of spoonfuls of the cut berries, next layer in the berry cream, then more cut berries. Finally, top with the cream that you set aside earlier, a sprinkle of crushed crackers, and a fresh mint sprig! Sit back and enjoy!!
