Spring Spruce Up
I generally try and get as much use out of an object as possible. I have had the same screen door for many years. Once the kids pushed holes through the screen, I racked my brain trying to come up with a way to still utilize the door without having to buy a new screen or rebuilding the old. My simple solution was burlap.

Here's an old photo of how the burlap looked. Since then, I have swapped out the burlap multiple times - using red, green, and tan burlap. At $2.00 a yard, it was a simple and cheap fix when necessary or whenever I got bored.
This spring, I noticed that the finish on the wood was wearing thin. It was time for an update. Nothing a fun, fresh coat of paint couldn't solve. I also saw a twist on my burlap idea - LACE!! What could be better? Probably nothing.

I like how the lace lets the front door color show through.
.JPG)
It was an easy, quick, and cheap upgrade and saved me from buying a whole new door.
A happy welcome to spring....now I just need some flowers to go with it.
Vintage Valentine
This is a picture that I found on pinterest.

I love these vintage candy boxes. I figured that I would try and recreate one. It went okay. With better supplies, I think it would have been a home run. I only had time to run into Walmart the last time I was in town. Their selection of craft supplies leaves a little to be desired. All I could find was red ribbon and some cheap red roses. Combined with some scraps of lace, this is what I came up with. It cost me all of $3.00 for the supplies. Well, I did have to buy a box of Lindor truffles to use as my empty box. It got emptied pretty quick. Now it's ready to be filled with homemade treats.

Not quite as beautiful as the vintage one, but worth trying again next year. I'll round up some more vintage looking goods in a more subtle hue.
Sew Useful
I love old sewing machines. One day I counted 9 in the house. I have ones from various eras. I have a few old black ones, but my favorite is a green one from the 40s or 50s. It's been boxed up for the last year. I was missing it, so I took it out just to admire it - it's color, it's lines. While admiring it, I had this thought come to me. Why keep it boxed up? It inspires me when I see it. I should leave it out. Then I decided, why not use it as a lamp on the landing? It does have a light in it that puts off a nice glow.

I am glad I found a use as an excuse to bring out my beautiful green sewing machine. (Sounds like a line from a deranged Dr. Suess book)
More Spray Paint Projects
I found this gem awhile back at the thrift store and knew with a little help, it would come in handy in my sewing loft (really it's just the landing).

As with the other projects, I sanded it and wiped it clean. I did use a 3M steel wool pad since it is metal instead of just my green scrubbie.
Then I applied 4-5 light coats of paint and.....

There you go!! A storage place the perfect size for my vintage patterns I am hoping to use in the near future. I spent a few hours getting my sewing area all organized so that I would want to be there and be inspired. It's much easier to be motivated to clean up when you have pretty things to put your stuff into.
Feeling A Little Blue
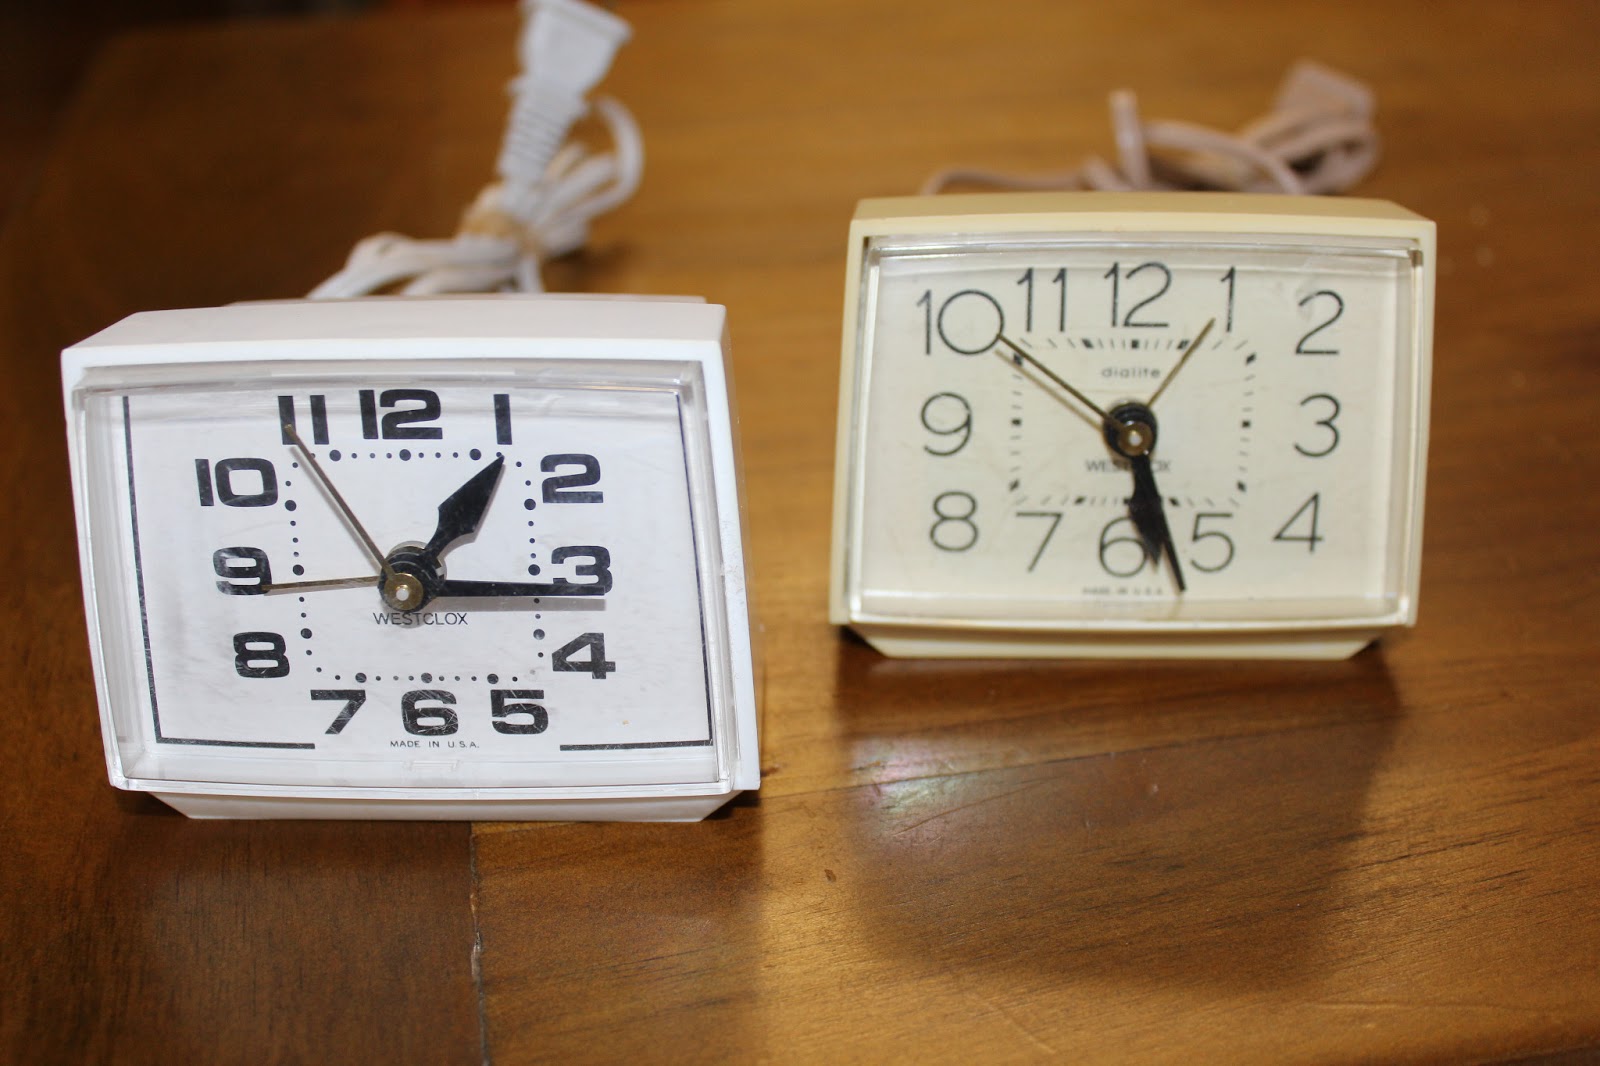
I found these cute, little, vintage clocks at my local thrift store. They are the perfect size for a small bed side table or in my little trailer. They were missing something.....something fun, something whimsical. I knew what had to be done. Spray paint!! I have a love affair with the stuff. It can make the most dreary of things bright and new.

The first step is to take a scrubbie to it - being careful not to scratch the plastic face. It roughs up the surface just enough so that the paint will adhere. Clean the surface to remove any grime or residue from the sanding.

All of the parts that you would like to remain unpainted must be taped off. I didn't want to mess with trying to tape off the whole cord, so I just put the bulk of it in a ziplock baggie.

Then you apply many (I did four) light coats of spray paint. I chose this paint not only for it's fabulous color, but for the fact that it can be used on metal, plastic, or wood. Plus Rustoleum is a great brand. Once your project is dry, just remove the tape and enjoy your new treasure!

I also used this same technique on a vintage ice crusher for my trailers. I have been looking at colored ones on ebay. They go for any where from $15 - $30. I found a white one at the thrift store for $2. With a little spray paint, I have one that is the perfect color to go in Opal's pastel decor or Gigi's bright and cheery interior.
Aren't they all so cute? I can say that only because I gave new life to them...kind of like my children. I think I like the blue/cream clock best. Now's the time for you to go find your own treasure and get to spraying!!
Old Shirt, New Apron
Since I am obsessed with aprons, and new fabric is usually too expensive to use as a wearable dishtowel (isn't that what an apron really is?), I am constantly looking for ways to use existing items in apron production. I have used curtains, sheets, pillowcases, and the like, and made some super cute aprons while saving on the amount of time and sewing in their construction. My latest project was to make an apron out of an old, man's dress shirt. I picked one up at the thrift store for $3.00.
The first step was to cut out the sleeves, collar, and along the side seams. Then, while laid out flat on the floor, cut into the front of the shirt to form the back straps of the apron. I know that I am not explaining it well. Maybe a picture can help.

 This is the finished product, but you can see that the back of the man's shirt forms the apron front and the front of the shirt is cut into a thinner width to form the straps. I also cut the neck bigger after removing the collar. After cutting, I simply used bias tape to cover the raw edges and added vintage buttons on the front sides of the apron.
I am excited to use this apron over the Christmas baking season. I think it's pretty festive, all red and green. I do think that I will add a vintage Christmas hankie on the front as a pocket. Also, thanks to Hannah for being my model.

This would be a fun gift for anyone who loves to cook, especially if it's made from his or her dad's/grandpa's old shirt. Plus, it's super easy, super cheap, and with a wide variety of shirts at the thrift store, the possibilities are endless.
From Sheet to Chic
well, kind of...
I picked up a good tip from a blogger I follow. She is an amazing at dress designer and seamstress. I enjoy seeing all that she is capable of creating. When she is trying out a pattern for the first time, she will use a thrifted sheet for her construction instead of buying new, expensive fabric. From past personal experiences, I have spent a lot on fabric I adored, just find out that the pattern I had used wasn't flattering to my figure or it just didn't turn out right. While in Portland with friends, I came across a super cute, day to night dress pattern on clearance. How could I resist?
A few days later, I was lucky enough to find a sheet that was in excellent condition for $2.00. The colors are a little bright, but I loved the geometric, honeycomb print, so I immediately got to work trying out my new dress pattern.

This picture is a little dark and hard to see any detail. It has some nice, big, side pockets and ties to adjust the fit. I am glad that I chose to use a sheet, seeing that the neck line in a tad too big and I can make adjustments when I make one out of new material. It's still cute enough and comfortable enough to wear around the house, so not all is lost.

This picture is a little dark and hard to see any detail. It has some nice, big, side pockets and ties to adjust the fit. I am glad that I chose to use a sheet, seeing that the neck line is a tad too big. I can make adjustments when I make one out of new material. It's still cute enough and comfortable enough to wear around the house, so not all is lost. (Maybe sometime I will brave enough to take a picture with the dress on).
Pitchfork Welcome

Who doesn't love Pinterest? I know that I love to peruse all of the pictures - it helps inspire my creativity. A week or so ago, I saw the cutest fall door hanging made out of an old vintage rake head. I figured that an old rake should be easy enough to find....well, I was wrong. I checked my local thrift stores and antique malls to no avail. Then, upon further thought, I figured why not use an old pitchfork head. We are farmers after all and broken pitchforks are par for the course.
I had David be on the lookout for one and within a couple days he showed up with two to choose from. One was simply just the head with bent tines. I loved it's rusty patina, but it seemed to lack the size I wanted. The other was one with a blue head and some of it's handle still in place. I chose the latter - the hint of blue kind of grew on me.
I simply added a few fall colored sprigs and a bow from some ribbon I had stashed away. I like how it turned out and it ended up being really cheap and easy to do. I did find, in my hunt for a garden rake, the old small head rake that is standing by the chair. I think it adds to my entry way with it's copper colored head and green handle. It was a steal at $3. I get so excited when I finally change out my summer flowers for those mums of fall. It finally feels like fall has arrived.

I just need to find a good old fall colored, plaid blanket to drape over my porch swing. Then my fall decor on the porch will be complete. Fall is my favorite time of year and I can't help but get excited about it. I think Jerry the cat is ready to welcome any that would like to drop by!
Drop Leaf Table Do-over

I found this cute little table at a thrift store for $5. These vintage drop leaf tables are easily found and can be used for various purposes - a side table, sewing table, game table, etc. With all of it's uses, why not purchase it and have some fun? The top was in poor condition, but it was sturdy and I loved the detail on the legs, even though it did show some wear. I like to think of it as character.
I decided that I needed to do something with the top, but wanted to keep the legs. With modge podge so popular right now and the fact that I have oodles of fabric stashed away, I figured why not put some fun fabric on the top. It's much easier than refinishing the top. Plus, these old drop leaf tables aren't always made of the best wood. It was a cheap way to experiment and if it didn't work, I wasn't out much. I sanded the top and simply applied the modge podge, the fabric, and went over it again with the modge podge. After it was all dry, I sealed it with some polyurethane, so it was water proof.

I'm happy with the way it turned out. I was lucky enough to have this cute vintage fabric on hand that just matched the color of the legs. It's now in my basement as a side table....I love it!!

Vintage Suitcase Sewing Kit

I have a dear friend who loves to sew and quilt even more than I do! It was her birthday last week and I wanted to give her something that would inspire her creativity, but also not limit it with one specific pattern/project.
I had picked up a small vintage piece of luggage at my local thrift store awhile back and figured it would make a great container for some quilting supplies and also double as a take-a-long sewing kit for those times you find yourself waiting around for children and want to squeeze in a little handwork!

I filled it with various fabric, an embroidery pattern, some vintage quilt blocks, ribbon, rick rack, some linen cleaner, and various sewing supplies. I simply glued some ribbon on the lid to hold scissors, tape measure, buttons, floss, thimble, and thread. It would have been better to use some elastic, but then I would've had to line the lid with a fabric covered cardboard piece. With lots of old suitcases, this would be ideal since the inside is usually pretty worn or stained. The inside of this one was pres-teen and I hated to cover it up. If the glue doesn't hold, she can just throw those supplies in and be off!

Vintage Luggage -
Lately, I have been picking up pieces of vintage luggage at my local second-hand store. I love the variety of colors you can find - pale blues, mossy greens, turquoises, and bright geranium reds - so much more fun than the colors used today and they are much sturdier too! I've acquired more than my share and think possibly my kids secretly wonder when I am going to depart on the journey I've been preparing for......

My oldest daughter is graduating and has some special friends she would like to remember. We thought it would be fun to "re-do" some of the vintage pieces I've found and make them into survival kits as they journey out into the real world. Some of the luggage has wear.....of course and we found some coordinating fabric to cover up the dings and scuffs that have occurred over time.
First, I laid out the fabric wrong side up, placed the suitcase on top and traced with a pencil, leaving a 1/2" border. I brushed the top with a thin coat of Modge Podge. I then centered the fabric and laid it on. I tugged out any wrinkles and smoothed it out making sure that I had enough allowance around the edges to tuck under the binding.

I used a flat head screw driver to gently push in the extra fabric and hide the raw edges.

Here is the suitcase once I had finished tucking all of the edges!
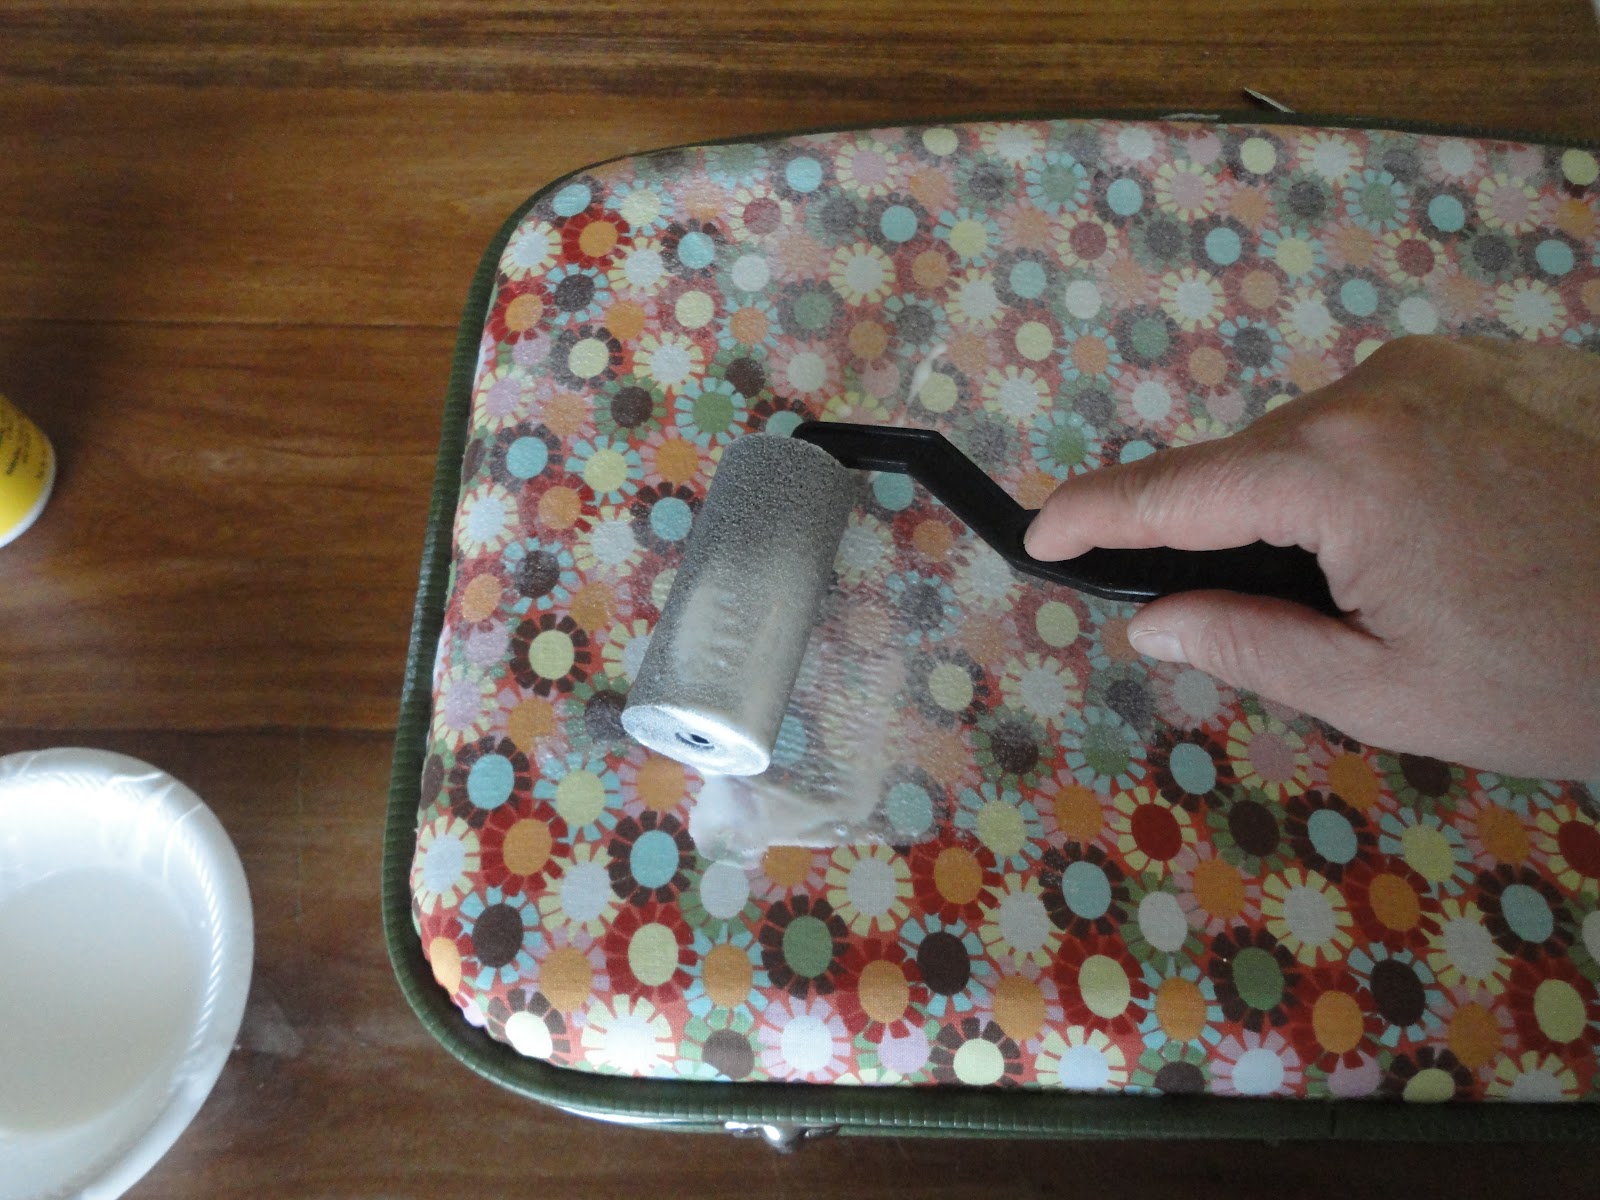
Finally, I finished with a pretty heavy coat of Modge Podge to make sure the fabric was secured to the lid and to seal the fabric so that it could be wiped clean - once it's dry, of course!
Here's the finished product! I ended up doing both sides and it's super cute! Now to fill it with all the essentials needed for a sweet girl to venture out into the world!

It was simple enough that I have some others I would like to do! It's a pretty cute gift for not a lot of $. I picked up each suitcase for a couple of bucks and 1/2 yard of fabric would cover any small - medium case. I'm super excited to do some more!

* Check out our new farm friends on the Life on the Farm tab!! They are adorable!!
Another Hankie idea -
Here is another hankie idea. I had a hard time trying to decide whether I should post or not, but with all the fun, lacey, girly fashion out there, I figured why not?
This is an idea that I saw in a magazine a few years back. Since I was on the "hankie" thing, I thought I'd give it a try and how it would go. All you need is a t-shirt and an old hankie. I found a colored T in my closet and figured that since I was tired of it the way it was, I wasn't out anything if the project flopped. Here's the steps I used -
- First find a t-shirt and coordinating hankie


-Next, fold your hankie in half to the size and width of desired ruffle - iron.
- Now, baste stitch close the edge and gather to desired width.

- Take top edge and fold to the back just below stitching and iron. This helps in placement when sewing to your t-shirt.

- Center on t-shirt just below the neck band, right side up. Now, flip the hankie up to reveal the folded under edge and stitch just below fold but above basting, along neck line.


A Hankering for Hankies Continued
 I wanted to post some really easy, fun ideas to use hankies as a fashion statement! Aside from hankies, you only need a few key pieces to pull these ideas off. First, using hankies accompanied with vintage broaches to make fun, colorful bracelets of bling. I also have an affection for my grandmother's costume jewelry, so to pair them with my collection of hankies puts two of my obsessions to good use.
* Hankie-Broach Bracelets -
Simply fold your hankie opposite corners together to form a triangle. Then take the long edge and start to roll at the width desired for your bracelet. Open broach, place in the middle of rolled hankie, and secure. Place on wrist, wrap, and tie. Easy as that!!


Another easy idea is to pair hankies with a watch face. I just bought a cheap watch, took off the straps and threaded through one of my many hankies. I love both of these ideas because they are sooo versatile - change outfit, change hankie!!
*Hankie Watch -
Roll hankie as above, but take ends of hankie and thread through top and bottom of watch face, coming from behind. Place on your wrist and pull ends to the back side of wrist and tie.

You can also just tie hankies around your wrist without either the broach or the watch face - still cute, still fun!!
So I've tried to explain, but now I can show you some reasons why I love hankies! I will be posting a couple of ideas over the next few days. I hope they inspire you to be creative with hankies!

If the flowers aren't in bloom outside, just use these ideas to help bring the feeling of spring into your home. One of the easiest ideas is to make a table runner from them. First find 3-5 hankies (depending on the size of your table) and lay them in a row, making sure that they are the same size. Once you've placed them in a way that suits you, just zig-zag stitch them together. Once you grow tired of it, unpick and re-use them in another way. If you have a square table, you could make a square of four hankies to fit!

They are also very easily made into throw pillows. Most hankies are a little too thin by themselves to be the pillow front alone. For this reason, find a light colored, solid fabric and back your hankie with it. Cut the solid to the same size of the hankie. Lay the fabric right side up and top with hankie right side up. Now, cut a back fabric the same size and place it right side down on top of hankie. Stitch at 1/4 inch all the way around, minus a couple of inches. Use this opening to turn pillow right side around. Now stuff and whip stitch closed! Easy throw pillow. So easy you can make quite a few in an afternoon!
More uses for old crates
If an indoor herb garden isn't your thing - you might want to try these ideas that put an old crate to good use. It's design screams out organization, so here's a few thoughts.
 One way of putting it to good use, is as a desk/drawer organizer. Just line the compartments with clear plastic cups and fill with necessary desk essentials - paper clips, rubber bands, tabs, sticky notes, etc.
 I have a quite a few obsessions - one being that I love to buy vintage trim anywhere I can find it. I like to use it when making aprons, dishtowels, and other sewing projects. I find a lot of them at second-hand and thrift stores. It's a task trying to keep them organized, but with a crate there is enough compartments that I can sort them by color and style. Plus, the little cards that they come on are just the right size to fit.
Finally, a crate can come in handy when having a cookout or buffet style party. It can hold napkins, utensils, glasses, or salt and pepper. I pictured it using more of a "lady luncheon" theme, but it would work really well for a BBQ cookout with enough space for condiments too. The best part is that it's portable - one trip out to the table and one trip back in to put it all away!

P.S. Would be an awesome way to present a sundae bar. With 24 compartments - just imagine the many toppings that you could come up with. I think that's what I'll try next!
Indoor, portable herb garden
One way to bring spring inside - even if mother nature seems to refuse to let it happen outside - is to make an indoor, portable herb garden. Fresh herbs can really make a ho-hum dish into something special. Over the last few months, I have really enjoyed using fresh herbs as opposed to dry ones. The only downside to this, is that fresh herbs can be very expensive and I never seem to use all of them before they start to go bad. So to solve this problem, I decided that since the fresh herbs that I buy - Living Herbs - come with roots intact, I would find a way to plant them and keep them alive indoors. Why not?

In looking around my house, I decided that my vintage Pepsi crate was just what I was looking for! It had 24 separate compartments, just right for planting my new herbs in some small plastic cups and plenty of spaces for a wide variety of herbs. It also has handles, so I can move it from room to room as the sun moves from my east windows to the west. Perfect!!

Now you can use fresh herbs whenever you want without the worry of cost, wondering if you have enough, or if they've gone bad. And, as an added bonus, they smell wonderful!
